

Integrate Login with Phone button in mobile
Introduction
Download Demo App
To integrate the "Login with Phone" functionality into your Android app, follow these fundamental steps:
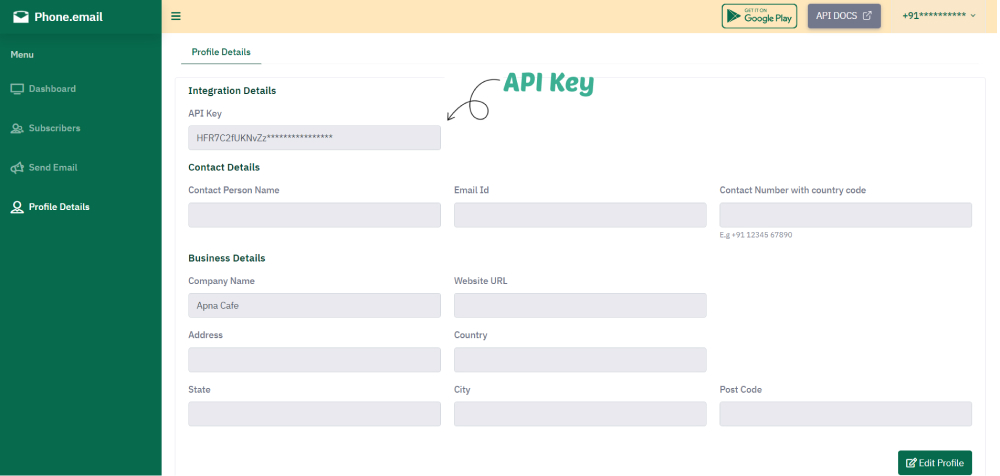
1. Get the API Key
To enable the "Login with Phone" feature on your Android app, start by logging into the Phone Email admin Dashboard at https://admin.phone.email. Within the Profile Details section, you'll find an API key that is essential for subsequent usage.
2. Login Button Implementation
In your login screen, you have a login button with a click listener that launches the AuthActivity using the registerForActivityResult API:
<Button android:id="@+id/btnPhone"
    android:layout_width="wrap_content"
    android:layout_height="64dp"
    android:text="@string/log_in_with_phone"
    android:drawableLeft="@drawable/ic_call"
    app:layout_constraintBottom_toBottomOf="parent"
    app:layout_constraintEnd_toEndOf="parent"
    app:layout_constraintStart_toStartOf="parent"
    app:layout_constraintTop_toTopOf="parent" />
After incorporating the button, implement a click listener that utilizes the registerForActivityResult API to launch the AuthActivity.
binding.btnPhone.setOnClickListener {
    // Open AuthActivity on the current screen
    val intent = Intent(this, AuthActivity::class.java)
    launcher.launch(intent)
}
3. Result Handling with Launcher
You have registered an activity result launcher to handle the result of the AuthActivity. This launcher is responsible for extracting the JWT from the result data:
// Declare the launcher
private val launcher = registerForActivityResult(ActivityResultContracts.StartActivityForResult()) { result ->
    // Handle the result data, extract access_token if available
    val accessToken = result.data?.getStringExtra("access_token")
    // Further authentication logic or UI updates can be performed here
}
4. AuthActivity Implementation
The AuthActivity is responsible for verifying the phone number through a web-based authentication process. Upon successful verification, the JWT is obtained from the JavaScript interface and set as the result. Here's how the AuthActivity is implemented:
Replace the placeholder mobile details in the AuthActivity (PHONE_COUNTRY and PHONE_NUMBER) with your actual mobile information.
class AuthActivity : AppCompatActivity() {

    lateinit var binding: ActivityAuthBinding
    private var deviceId = ""

    override fun onCreate(savedInstanceState: Bundle?) {
        super.onCreate(savedInstanceState)
        binding = ActivityAuthBinding.inflate(layoutInflater)
        setContentView(binding.root)
        binding.wvAuth.apply {
            settings.javaScriptEnabled = true
            settings.javaScriptCanOpenWindowsAutomatically = true
        }

      deviceId = Settings.Secure.getString(contentResolver, Settings.Secure.ANDROID_ID)

      val url = "https://auth.phone.email/log-in?client_id=${AppConstants.CLIENT_ID}" +
                "&auth_type=1" +
                "&device=$deviceId"

        binding.wvAuth.addJavascriptInterface(WebAppInterface(this), "Android")
        binding.wvAuth.loadUrl(url)
        binding.wvAuth.webViewClient = client
    }

    private val client = object : WebViewClient() {

        override fun shouldOverrideUrlLoading(view: WebView, url: String?): Boolean {
            // Handle the URL loading within the WebView
            if (url != null) {
                view.loadUrl(url)
            }
            return false
        }
    }

    // Define the JavaScript interface
    class WebAppInterface(private val activity: Activity) {

        @JavascriptInterface
        fun sendTokenToApp(data: String) {
            val resultIntent = Intent().apply {
                putExtra("access_token", data)
            }
            activity.setResult(Activity.RESULT_OK, resultIntent)
            activity.finish()
        }
    }
}
5. Handling the Access Token in the Calling Activity
The access token obtained from the AuthActivity can now be handled in the original calling activity within the launcher callback.
private val launcher = registerForActivityResult(ActivityResultContracts.StartActivityForResult()) { result ->
	// Handle the result data, extract access_token if available
	val accessToken = result.data?.getStringExtra("access_token")
	if (accessToken != null) {
		if(this.isConnected) {
			//get user info from access token
			getUserInfo(accessToken)
		}else{
			toast { getString(R.string.no_internet) }
		}

	}
}

private fun getUserInfo(accessToken: String) {

val call = ApiInterface.RetrofitHelper.apiService.getUserInfo(accessToken,  AppConstants.CLIENT_ID)
call.enqueue(object : Callback<JsonObject>{
  override fun onResponse(call: Call<JsonObject>, response: Response<JsonObject>) {
    if (response.isSuccessful) {
      val userInfo = response.body()!!
      if(userInfo.isJsonObject && userInfo.get("status").asInt == 200){
        val phoneCountryCode = userInfo.get("country_code").asString
        val phoneNumber = userInfo.get("phone_no").asString
        val phJWT = userInfo.get("ph_email_jwt").asString

        // Further authentication logic or UI updates can be performed here
        // use this verified phone country and phone number to register this user on your app backend
        // Also validate this jwt on server side by your API_KEY
        // registerUser(phoneCountry, phoneNumber, jwt)

      }else{
        Log.w("TAG", "onResponse: Error in retrieving user info", )
      }
    }
  }

  override fun onFailure(call: Call<JsonObject>, t: Throwable) {
    Log.w("TAG", "onFailure: ${t.message}")
  }
})
}
In your APIInterface.kt file, define your api endpoint:
//Define the callback and URL in ApiInterface for getuser API
@FormUrlEncoded
@POST("getuser")
fun getUserInfo(@Field("access_token") accessToken:String, @Field("client_id") clientId:String): Call<JsonObject>
6. Display Email Count on the Screen (Optional)
To display the email count on the screen, you can make an API call using Retrofit.
Add the following dependency to the dependencies block in your build.gradle file.
implementation 'com.squareup.retrofit2:retrofit:2.9.0'implementation 'com.squareup.retrofit2:converter-gson:2.9.0'
Here's an illustrative example of how to execute the email count API call:
  // Assuming you have the JWT stored in the variable 'jwt'
val call = ApiInterface.RetrofitHelper.apiService.getEmailCount(jwt, "app")
call.enqueue(object : Callback<CountResponse>{
    override fun onResponse(call: Call<CountResponse>, response: Response<CountResponse>) {

        if (response.isSuccessful) {
            if (response.body()!!.emailCount.isNotEmpty()) {
                binding.tvCount.text = response.body()!!.emailCount
            }
        }
    }

    override fun onFailure(call: Call<CountResponse>, t: Throwable) {
        Log.w("TAG", "onResponse: Error: ${t.message}")
    }
})
In your APIInterface.kt file, define the Retrofit interface:
interface ApiInterface {
    object RetrofitHelper {
        val apiService: ApiInterface
            get() = RetroInstance.getRetroInstance().create(ApiInterface::class.java)
    }

    @FormUrlEncoded
    @POST("email-count")
    fun getEmailCount(@Field("merchant_phone_email_jwt") jwt:String, @Field("source") source:String): Call<CountResponse>
}
Initialize RetroInstance
  fun getRetroInstance(): Retrofit {
    val client = OkHttpClient.Builder()
        .addInterceptor(interceptor)
        .connectTimeout(100, TimeUnit.SECONDS)
        .readTimeout(100, TimeUnit.SECONDS)
        .build()

    return Retrofit.Builder()
        .client(client)
        .baseUrl("https://eapi.phone.email/")
        .addConverterFactory(ScalarsConverterFactory.create())
        .addConverterFactory(GsonConverterFactory.create())
        .build()
}
7. Load Email List in WebView (Optional)
To display the email list, you can open a URL in a WebView. Assuming you have a WebView in your layout (e.g., binding.wvEmailList), you can load the URL as follows:
val emailListUrl = "https://web.phone.email/"
binding.wvEmailList.settings.javaScriptEnabled = true
binding.wvEmailList.loadUrl(emailListUrl)
binding.wvMail.webViewClient = object : WebViewClient() {
override fun shouldOverrideUrlLoading(view: WebView, url: String?): Boolean {
  // Handle the URL loading within the WebView
  if (url != null) {
    view.loadUrl(url)
  }
  return false
}
This documentation provides a concise overview of the user authentication process in your Android app, involving the launch of the AuthActivity and handling the resulting JWT in the calling activity. Customize the authentication logic and error handling based on your app's requirements.
Feel free to adapt and extend this documentation based on the specific needs of your application.
Should you encounter any technical challenges during the integration process, please don't hesitate to reach out to us for assistance.